How to Set Up a Passkey for Google Ads: Step-by-Step Guide
If you’re trying to access a Google Ads account, accept a Google Ads invitation, or make certain changes to an existing Google Ads account, you may see a message asking you to use or create a passkey.
If you’ve never used a passkey before, the process can be confusing—especially when Google asks you to approve the passkey using another device.
Don’t worry. In this guide, we’ll show you exactly how to create a passkey for your Google Account and use it with Google Ads.
Important: Google may show slightly different screens depending on your device, operating system, browser and password manager. The names of buttons may also vary slightly.
What Is a Passkey?
A passkey is a secure alternative to a traditional password.
Instead of typing your Google password, you can verify your identity using:
- Your fingerprint
- Face recognition
- Your phone’s screen lock
- A device PIN
- Another supported authentication method
Google says passkeys are designed to be more resistant to phishing because they can’t simply be copied, written down or shared like a password.
For Google Ads users, passkeys can also be used when Google needs additional verification for sensitive actions, including certain account access or linking changes.
Why Is Google Ads Asking Me for a Passkey?
You may encounter a passkey request when:
- Signing in to Google Ads
- Accepting an invitation to access a Google Ads account
- Changing certain account access settings
- Linking or making changes to accounts
- Performing another action that Google considers sensitive
Google’s current documentation says some advertisers may be required to use a passkey to authorize sensitive actions.
So, if you’re managing Google Ads for a client or working with an agency and Google suddenly asks you to set up a passkey, this is not necessarily an error.
Before You Start
Before creating your passkey, make sure:
- You are signed in to the correct Google Account.
- You have access to the phone or device that you normally use to verify your Google Account.
- Your phone or computer has a screen lock enabled.
- Bluetooth is turned on if you’re going to use your phone to approve a passkey on your computer.
- Your browser and operating system are reasonably up to date.
- You are not using Incognito or Private Browsing when creating the passkey.
Google currently supports passkeys on modern versions of Windows, macOS, ChromeOS, Android and iOS, with supported browsers including Chrome, Safari, Edge and Firefox.
Tip: Never create a passkey on a shared or public computer. Google recommends creating passkeys only on devices you personally own and regularly use.
Step 1: Open Your Google Account Security Settings
First, sign in to the Google Account that you use for Google Ads.
Open your Google Account settings and go to:
Security & sign-in → Passkeys and security keys
You can also access the Google Account security settings from your normal Google Account menu.
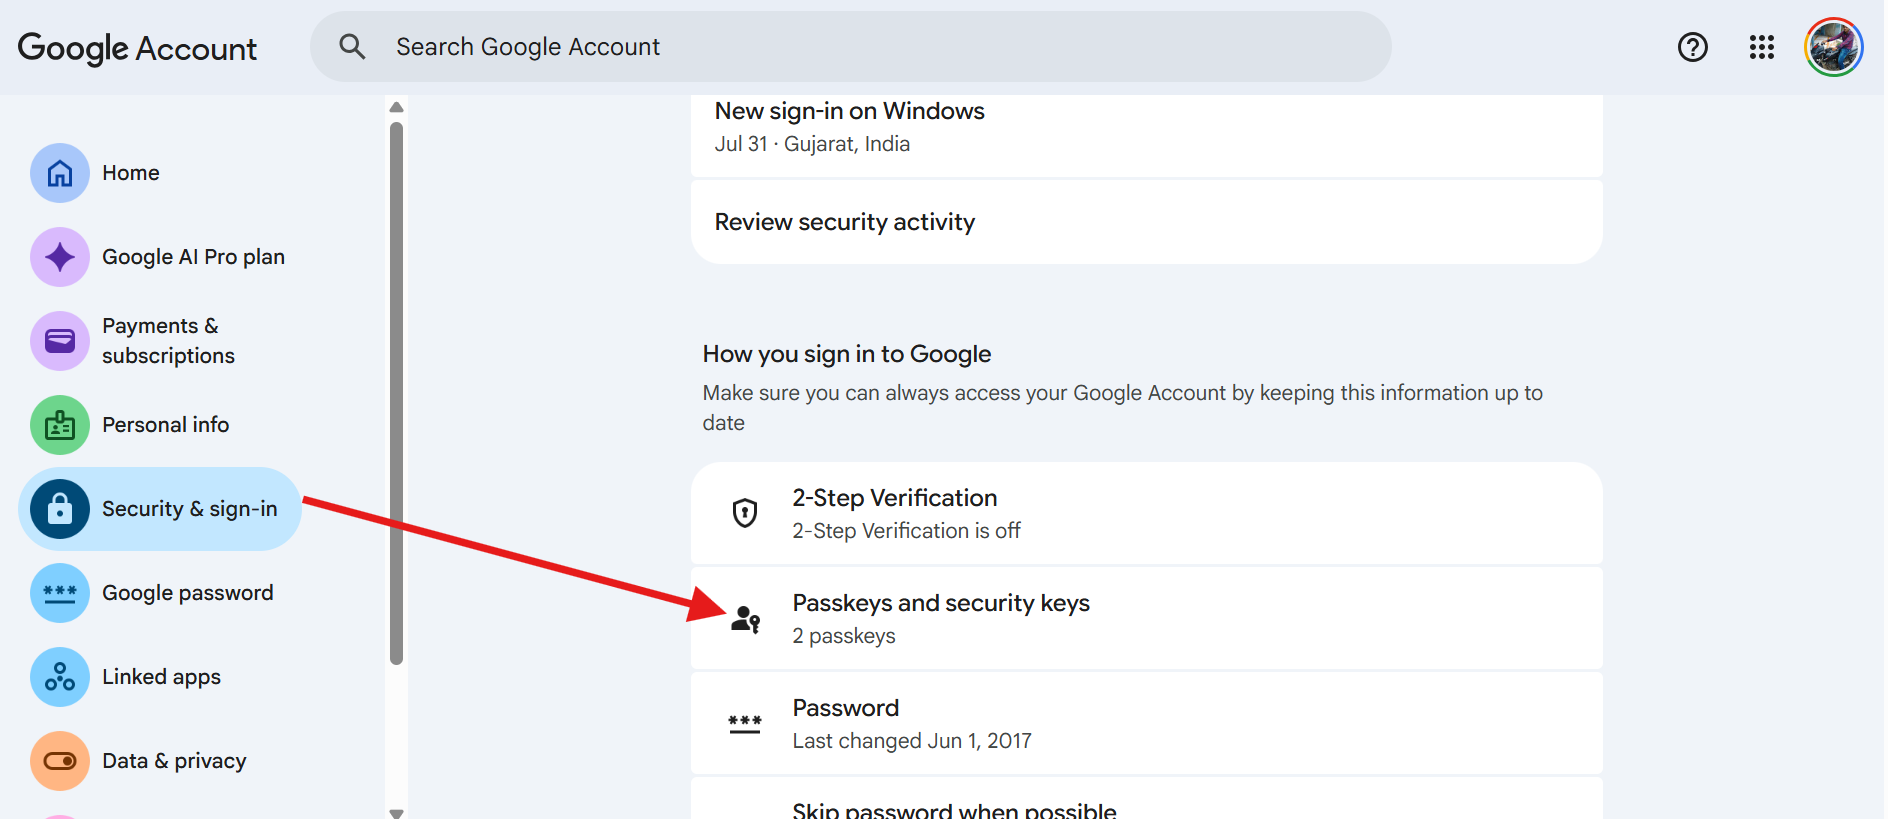
Make sure you are working with the same Google Account that has Google Ads access.
This is especially important if you have multiple Gmail or Google Accounts signed in in the same browser.
Step 2: Open “Passkeys and Security Keys”
Under the How you sign in to Google section, select:
Passkeys and security keys
Google may ask you to verify your identity before allowing you to manage your passkeys.
If Google asks for your Google Account password, enter your normal Google Account password.
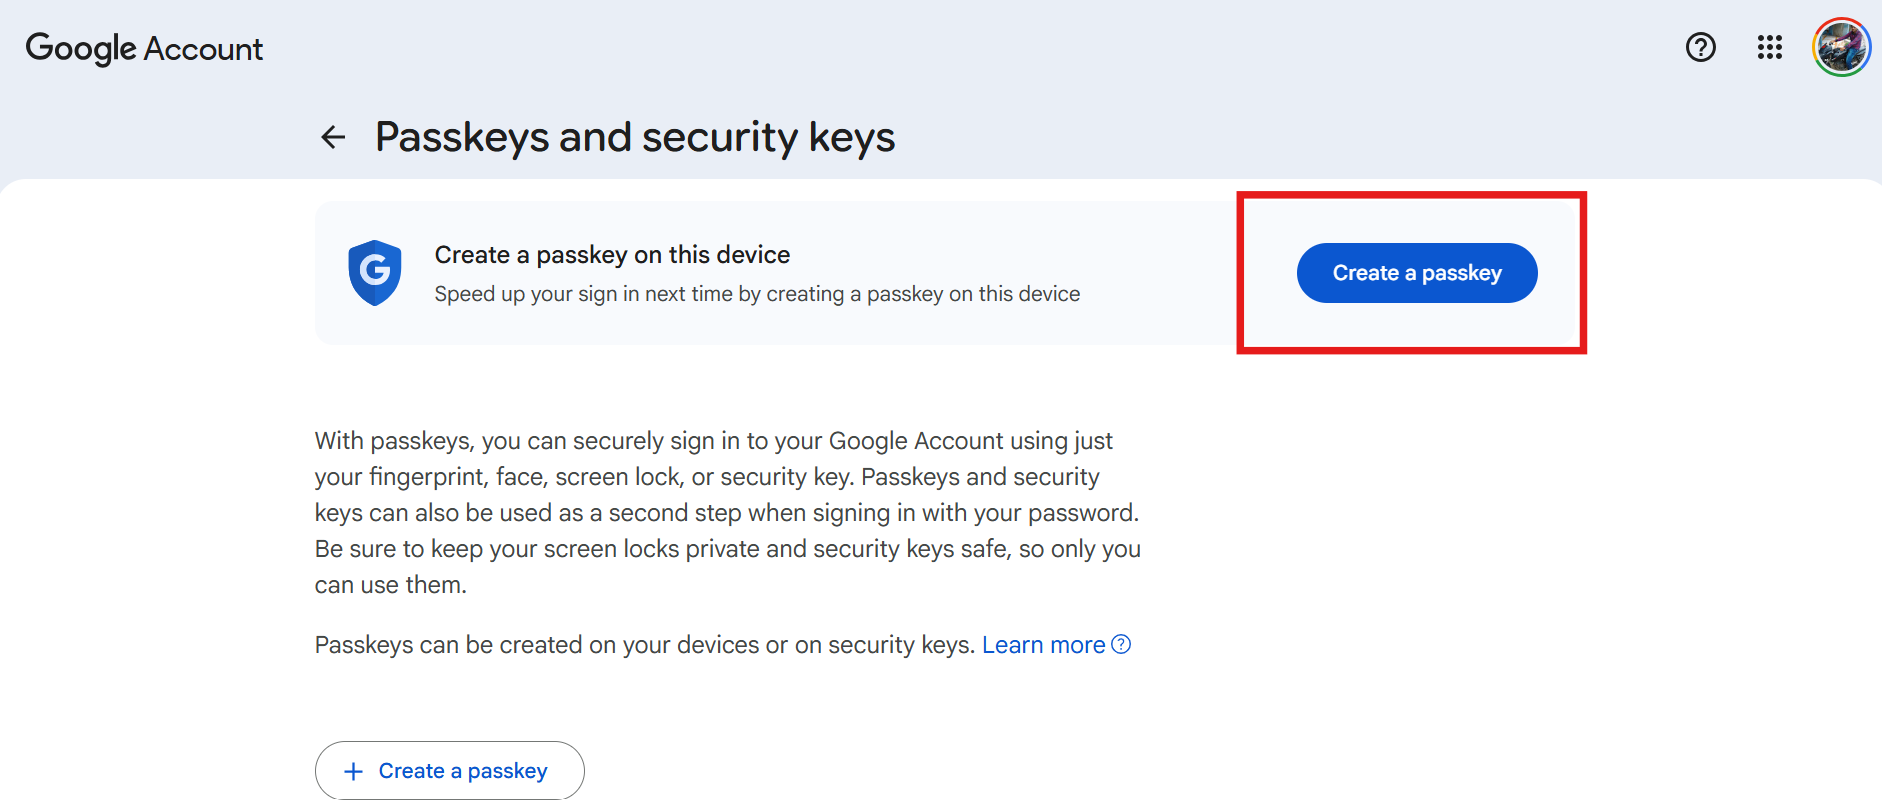
You should now see the passkeys and security keys already associated with your account.
Step 3: Check Your Existing Passkeys
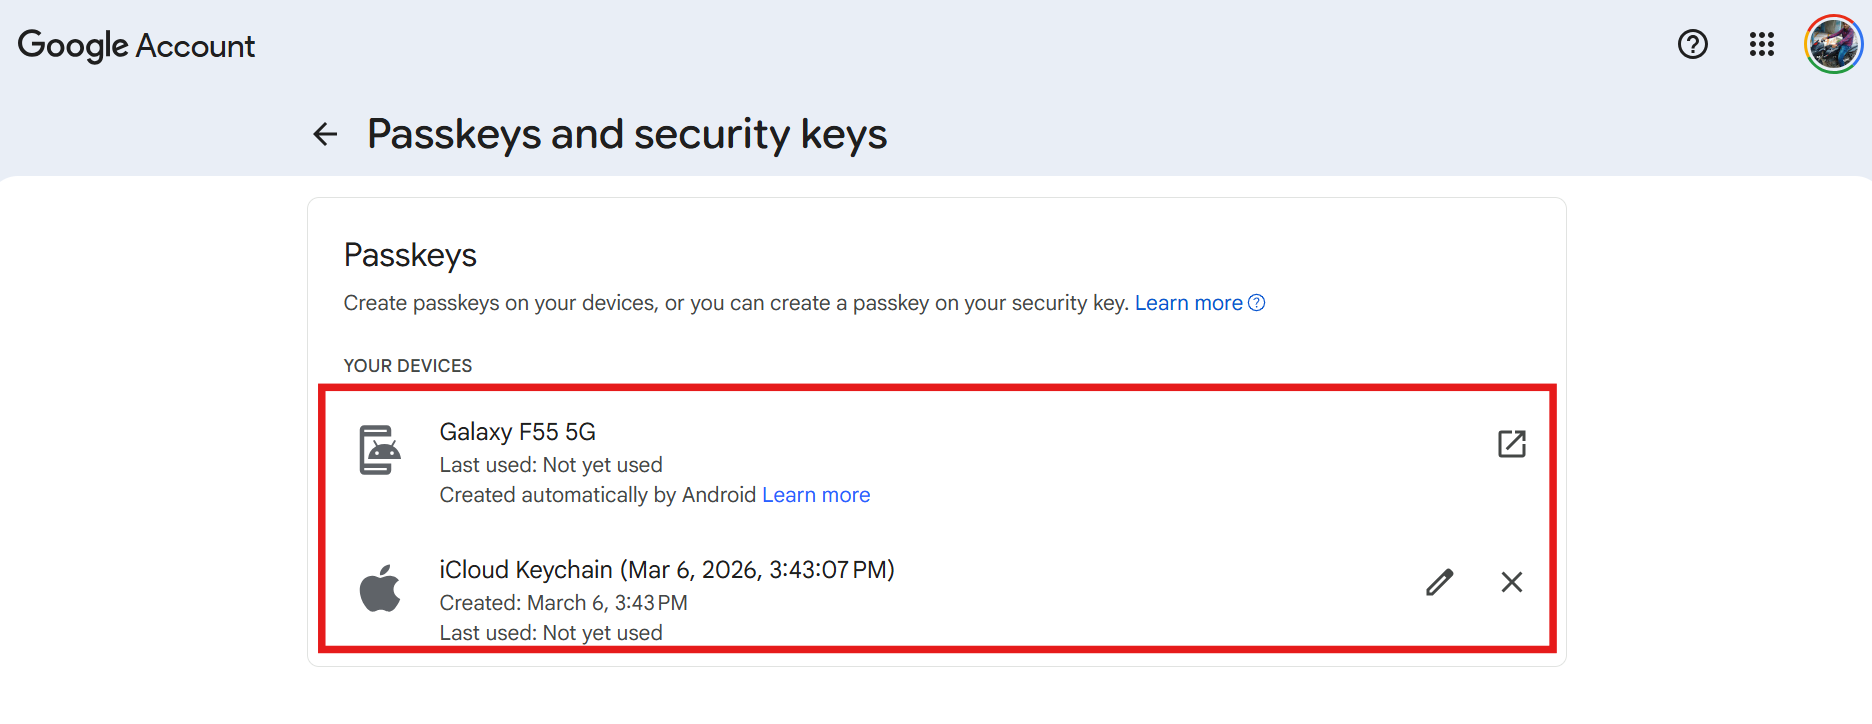
On the Passkeys and security keys page, you may already see one or more devices.
For example, Google may already have a passkey associated with your phone or another device that you regularly use.
Don’t be concerned if you see a passkey that you didn’t manually create on your computer. Depending on your device and password manager settings, passkeys can be saved and synced across supported devices.
Now comes the important part.
If you want to use your desktop or laptop for Google Ads, you can create a passkey on that device.
Step 4: Click “Create a Passkey”
Click:
Create a passkey
Google will now ask you how you want to create or save the passkey.
If you’re using Chrome, you may see an option to save the passkey using Google Password Manager or another available password manager.
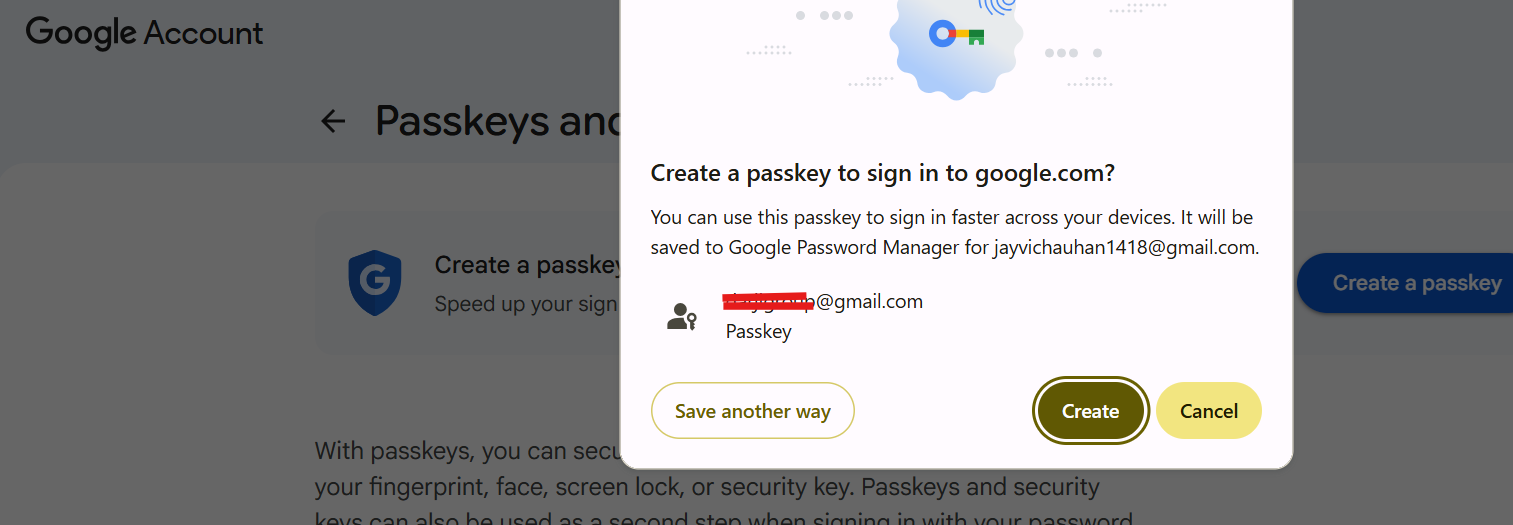
Follow the instructions shown on your screen.
Step 5: Save the Passkey on Your Computer
If Google offers to save the passkey in your browser’s password manager, select the appropriate option.
Depending on your computer and browser, you may then be asked to verify that you own the device.
For example, you may be asked to use:
- A device PIN
- Windows Hello
- Fingerprint
- Face recognition
- Another device authentication method
The exact screen will depend on your operating system and browser.
Important: Do not assume that every user will see a “6-digit PIN” screen. The authentication method is determined by the device and operating system.
Google’s documentation confirms that the device’s screen lock, such as a PIN, fingerprint or Face ID, is used as part of passkey authentication.
Step 6: Approve the Passkey Using Your Phone
This is the step where many users get confused.
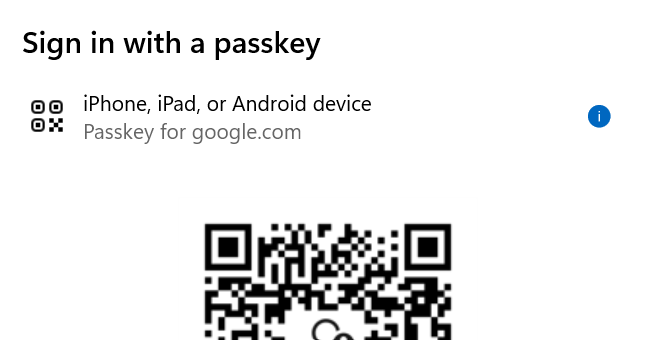
If Google asks you to use another device, you may see an option such as:
Use another device
or
A different phone or tablet
Select that option.
Google may then display a QR code on your computer screen.
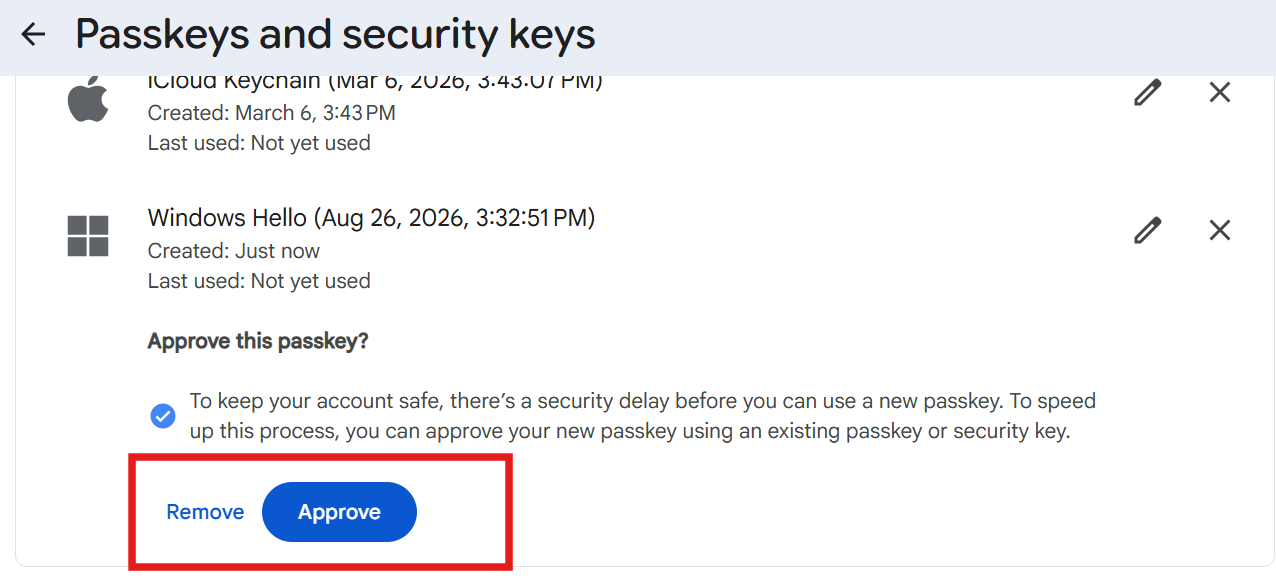
Before scanning the QR code
Make sure:
Bluetooth is turned ON on your computer and phone.
Your phone should also have a screen lock, such as a PIN, fingerprint or Face ID.
Step 7: Scan the QR Code
Take the phone that already has your Google Account/passkey available.
Use your phone’s camera to scan the QR code displayed on your computer.
Your phone should then ask you to confirm that you want to use the passkey.
Depending on your device, you may need to verify yourself using:
- Fingerprint
- Face recognition
- Phone PIN
- Screen lock
Google’s current Google Ads instructions specifically describe this cross-device workflow: when the passkey is stored on another device, a QR code can appear on the computer, which you scan with your phone and then complete the biometric verification.
Step 8: Your Passkey Is Ready
Once the verification is successful, your computer should complete the passkey setup.
You should now see the newly created passkey listed under:
Google Account → Security & sign-in → Passkeys and security keys
Congratulations—you’ve successfully created a passkey for your Google Account.
How to Use the Passkey With Google Ads
Now you can use the passkey when Google Ads asks you to verify your identity.
When signing in, Google may display your available passkey after you select your Google Account.
Select the passkey and complete the authentication requested by your device.
For sensitive Google Ads actions, Google may display a “Confirm it’s you” message.
If your passkey is stored on your phone but you’re working on your computer, choose:
Use another device
or a similar option.
A QR code may appear. Scan it with your phone and complete the verification.
Google says this workflow can be used when performing sensitive actions on a desktop while the passkey is stored on your phone.
What If Google Ads Is Asking Me for a Passkey When I Accept an Invitation?
This is particularly relevant if you’re an agency, freelancer or marketing professional.
When someone gives you access to their Google Ads account, you normally receive an invitation by email. Google says you can accept the invitation by opening the email and following the instructions.
If Google asks you to verify yourself with a passkey during the process:
- Make sure you’re signed in to the correct Google Account.
- If you haven’t created a passkey yet, create one using the steps above.
- Return to the Google Ads invitation.
- Start the acceptance process again.
- When Google asks you to verify your identity, select your passkey.
- If the passkey is on your phone, choose the option to use another device.
- Scan the QR code using your phone.
- Approve the request using your phone’s security method.
- Return to Google Ads and complete the invitation process.
Important: A Google Ads invitation is tied to the Google Account/email address that was invited. Make sure you don’t accidentally accept the invitation using a different Google Account.
What If My Passkey Is on My Phone but I’m Working on My Laptop?
You don’t necessarily need to create another passkey just because you’re working on a different computer.
Google supports a cross-device passkey workflow.
When the computer asks you to verify your identity:
- Select “Use another device.”
- A QR code should appear.
- Scan the QR code using your phone.
- Complete the biometric or screen-lock verification on your phone.
- Your computer should then continue the authentication process.
This is one of the most useful features of passkeys because you can use a passkey stored on another supported device.
What If My Passkey Doesn’t Appear?
If your passkey doesn’t appear when you’re trying to sign in, check the following:
1. Check your screen lock
Make sure your phone or computer has a screen lock enabled.
2. Check the Google Account
If you’re signed in to multiple Google Accounts, make sure you’re using the account where the passkey was created.
3. Check your browser
Make sure you’re using a supported and updated browser.
4. Turn on Bluetooth
If you’re using your phone to authenticate on your computer, Bluetooth may need to be enabled.
5. Try “Use another way”
Google provides a Try another way option in some sign-in situations. This can allow you to use another available authentication method.
What If I Lost the Device That Has My Passkey?
If you lose a device that contains a passkey and you’re concerned someone could unlock the device, Google recommends removing that passkey from your account.
Go to:
Google Account → Security & sign-in → Passkeys and security keys
Find the passkey associated with the lost device and remove it.
Google also recommends maintaining recovery options such as a recovery phone number and recovery email.
Should You Create More Than One Passkey?
For people who regularly manage Google Ads accounts, having more than one trusted authentication method can be useful.
For example, you might have:
- A passkey on your primary phone
- A passkey on your personal computer
- Another supported recovery/authentication method
Google says you can create multiple passkeys for your account and recommends creating one on each device you use.
However, only create passkeys on devices you personally control.
Passkey vs Password: What’s the Difference?
Password | Passkey |
You type a password | You verify using your device |
Can potentially be shared | Designed not to be shared |
Can be stolen through phishing | More resistant to phishing |
You have to remember it | Uses your device’s authentication |
Can be reused across services | Uses cryptographic credentials |
Passkeys don’t mean you should completely ignore your Google Account recovery and security settings. Keep your recovery information up to date and maintain appropriate security options.
Final Thoughts
Passkeys may seem complicated the first time you set one up, but once you’ve created one, signing in and completing Google Ads verification can become much easier.
If Google Ads is asking you for a passkey, don’t panic. In most cases, you simply need to create a passkey for the correct Google Account and then use your trusted phone or computer to verify your identity.
The most important things to remember are:
Use the correct Google Account → Create the passkey → Keep Bluetooth enabled for cross-device verification → Scan the QR code → Approve on your trusted device.
Official Google Resources
For the latest instructions, Google’s official documentation is the best reference because the passkey screens can change as Google updates its products.
- url Google Ads: Use a passkey to log into your Google Ads account https://support.google.com/google-ads/answer/16968810
- url Google Ads: Use a passkey to complete sensitive actions https://support.google.com/google-ads/answer/16917887
- url Google Account: Make your account more secure https://support.google.com/accounts/answer/46526
